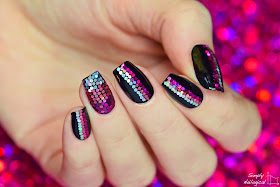
This mani was done as a bestie triplet mani between myself, Kristin of Lacquerstyle and Tracey of @missbellatracey on Instagram for our joint weekly nail art challenge, whose prompt this week was glitter placement and the theme being contrast. Pink and black cause I used to love Avril Lavigne, obviously.
VIDEO TUTORIAL AT THE END OF THE POST!
I'm so proud that I wasted 4 hours of my life to do this mani! I mean look, the hexes are somewhat evenly spaced! I'm warming up to take on one of Polish All The Nails master GP manis. I might need to be hooked up to life support afterwards.
The pink and black was certainly facking with my camera...
So I didn't cut or place them 100% perfectly, whatever, my eyes were buggin'.
How epic are these opaque holo glitters though? They are super high quality and do not bleed when you apply topcoat! Get yours at The Sparkly Shop!
1MIN OR LESS VIDEO TUTORIAL:
It's truly amazing cause while I make it look like this took me 1 minute it actually took me 4 hours! Makes you really wanna try it now, huh?
- Remember to use CLEAR NAIL POLISH and not top coat when adding strips on your base nail before taking the glitters on (top coat is too thick and will dry too quickly)
- Clear nail polish is made by many brands including Revlon, Cover Girl, Maybelline, and Sally Hansen to name a few. Just look for the key words 'clear' or 'natural' and make sure it doesn't say top coat.
- I use a toothpick to place the glitters; just lick or wet the end to easily pick up a single glitter
- Work fast after you've added a bar of clear polish so you can stick 'em before it dries
- Cut the edge glitters with cuticle nippers or tiny scissors before placing them (do as I say, not as I did)
- Awesome holo glitters from The Sparkly Shop!
Polishes used:
- Cult Nails 'Nevermore' (black creme)
- Revlon 'Clear' (clear polish)


You did an amaaaazing job!! Looks so shiny and beautiful! You made me want to do a glitter placement right now as soon as I get some good glitters.
ReplyDeleteThank you!! Yes these glitters from The Sparkly Shop are pretty awesome quality and they're holo!! And they don't bleed with top coat either, I love them :D
DeleteYou have taken your nail art to a whole new level, now all you do need to do is a WATER MARBLE. Pleeeeeease. You can do it!! :)
DeleteWOW! 4 hours is a long time but as a fellow nail blogger I know it's a proud accomplishment! This is gorgeous! You did a fantastic job :)
ReplyDeleteThanks so much! Yah I don't think I'll be doing these very often and it's not even exactly straight throughout lol I think I'll just stick to gradients haha... ;)
DeleteYou did an amazing job! I love how they turned out:)
ReplyDeleteBut could you use a clear base coat instead of clear polish?
Gosh I wish I had your patience!!
ReplyDeleteGosh I wish I had your patience!!
ReplyDeleteHi Cristine, these look wonderful! Thank you for taking the time to inspire your readers and followers with what must have been a difficult and detailed mani! =O
ReplyDeleteHoly shizzzzz this is so freaking awesome!!
ReplyDeleteThis is soooo got darn amazballs I can't stand it. I've only done two accent nails and that was enough for me. I just don't have the patience.
ReplyDelete